Multilingual Text-to-Image Search with MultilingualCLIP#
![]()
Most text-image models are only able to provide embeddings for text in a single language, typically English. Multilingual CLIP models, however, are models that have been trained on multiple different languages. This allows the model to produce similar embeddings for the same sentence in multiple different languages.
This guide will show you how to finetune a multilingual CLIP model for a text to image retrieval task in non-English languages.
Note, Check the runtime menu to be sure you are using a GPU/TPU instance, or this code will run very slowly.
Install#
!pip install 'finetuner[full]'
Task#
We’ll be fine-tuning multilingual CLIP on the electronics section of the German Fashion12k dataset, which contains images and descriptions of fashion products in German.
The images are a subset of the xthan/fashion-200k dataset, and we have commissioned their human annotations via crowdsourcing platform. Annotations were made in two steps. First, we passed the 12,000 images to annotators in their large international user community, who added descriptive captions.
Each product in the dataset contains several attributes, we will be making use of the image and captions to create a Document containing two chunks, one containing the image and another containing the category of the product.
Data#
We will use the DE-Fashion-Image-Text-Multimodal-train dataset, which we have already pre-processed and made available on the Jina AI Cloud. You can access it using DocArray.pull:
import finetuner
from finetuner import DocumentArray, Document

finetuner.login(force=True)
train_data = DocumentArray.pull('finetuner/DE-Fashion-Image-Text-Multimodal-train', show_progress=True)
eval_data = DocumentArray.pull('finetuner/DE-Fashion-Image-Text-Multimodal-test', show_progress=True)

query_data = DocumentArray.pull('finetuner/DE-Fashion-Image-Text-Multimodal-query', show_progress=True)
index_data = DocumentArray.pull('finetuner/DE-Fashion-Image-Text-Multimodal-index', show_progress=True)

train_data.summary()
Backbone Model#
Currently, we only support one multilingual CLIP model. This model is the xlm-roberta-base-ViT-B-32 from open-clip, which has been trained on the laion5b dataset.
Fine-tuning#
Now that our data has been prepared, we can start our fine-tuning run.
from finetuner.callback import EvaluationCallback, WandBLogger

run = finetuner.fit(
    model='clip-base-multi',
    train_data='finetuner/DE-Fashion-Image-Text-Multimodal-train',
    epochs=5,
    learning_rate=1e-6,
    loss='CLIPLoss',
    device='cuda',
    callbacks=[
        EvaluationCallback(
            query_data='finetuner/DE-Fashion-Image-Text-Multimodal-query',
            index_data='finetuner/DE-Fashion-Image-Text-Multimodal-index',
            model='clip-text',
            index_model='clip-vision'
        ),
        WandBLogger(),
    ]
)
Let’s understand what this piece of code does:
We start with providing
model, names of training and evaluation data.We also provide some hyper-parameters such as number of
epochsand alearning_rate.We use
CLIPLossto optimize the CLIP model.We use
finetuner.callback.EvaluationCallbackfor evaluation.We then use the
finetuner.callback.WandBLoggerto display our results.
Monitoring#
Now that we’ve created a run, let’s see its status. You can monitor the run by checking the status - run.status() - and the logs - run.logs() or run.stream_logs().
# note, the fine-tuning might takes 20~ minutes
for entry in run.stream_logs():
    print(entry)
Since some runs might take up to several hours/days, it’s important to know how to reconnect to Finetuner and retrieve your run.
import finetuner

finetuner.login()
run = finetuner.get_run(run.name)
You can continue monitoring the run by checking the status - finetuner.run.Run.status() or the logs finetuner.run.Run.logs().
Evaluating#
Once the run is finished, the metrics are calculated by the EvaluationCallback and plotted using the WandBLogger callback. These plots can be accessed using the link provided in the logs once finetuning starts:
           INFO     Finetuning ...
wandb: Currently logged in as: anony-mouse-448424. Use `wandb login --relogin` to force relogin
wandb: Tracking run with wandb version 0.13.5
wandb: Run data is saved locally in <path-to-file>
wandb: Run `wandb offline` to turn off syncing.
wandb: Syncing run ancient-galaxy-2
wandb:  View project at <link-to-project>
wandb:  View run at <link-to-run>
[07:48:21] INFO     Done ✨                                                                              __main__.py:195
           DEBUG    Finetuning took 0 days, 0 hours 8 minutes and 19 seconds                             __main__.py:197
           DEBUG    Metric: 'clip-text-to-clip-vision_precision_at_k' Value: 0.04035                     __main__.py:206
           DEBUG    Metric: 'clip-text-to-clip-vision_hit_at_k' Value: 0.79200                           __main__.py:206
           DEBUG    Metric: 'clip-text-to-clip-vision_average_precision' Value: 0.41681                  __main__.py:206
           DEBUG    Metric: 'clip-text-to-clip-vision_reciprocal_rank' Value: 0.41773                    __main__.py:206
           DEBUG    Metric: 'clip-text-to-clip-vision_dcg_at_k' Value: 0.57113                           __main__.py:206
           INFO     Building the artifact ...                                                            __main__.py:208
           INFO     Pushing artifact to Jina AI Cloud ...                                                __main__.py:234
[08:02:33] INFO     Artifact pushed under ID '63b52b5b3278416c15353bf3'                                  __main__.py:236
           DEBUG    Artifact size is 2599.190 MB                                                         __main__.py:238
           INFO     Finished 🚀                                                                          __main__.py:239
The generated plots should look like this:

Saving#
After the run has finished successfully, you can download the tuned model on your local machine:
artifact = run.save_artifact('mclip-model')
Inference#
Now you saved the artifact into your host machine,
let’s use the fine-tuned model to encode a new Document:
text_da = DocumentArray([Document(text='setwas Text zum Codieren')])
image_da = DocumentArray([Document(uri='https://upload.wikimedia.org/wikipedia/commons/4/4e/Single_apple.png')])

mclip_text_encoder = finetuner.get_model(artifact=artifact, select_model='clip-text')
mclip_image_encoder = finetuner.get_model(artifact=artifact, select_model='clip-vision')

finetuner.encode(model=mclip_text_encoder, data=text_da)
finetuner.encode(model=mclip_image_encoder, data=image_da)

print(text_da.embeddings.shape)
print(image_da.embeddings.shape)
(1, 512)
(1, 512)
what is select_model?
When fine-tuning CLIP, we are fine-tuning the CLIPVisionEncoder and CLIPTextEncoder in parallel.
The artifact contains two models: clip-vision and clip-text.
The parameter select_model tells finetuner which model to use for inference, in the above example,
we use clip-text to encode a Document with text content.
Inference with ONNX
In case you set to_onnx=True when calling finetuner.fit function,
please use model = finetuner.get_model(artifact, is_onnx=True)
Before and after#
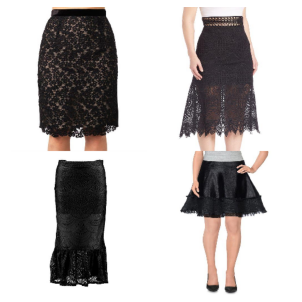
We can directly compare the results of our fine-tuned model with an untrained multilingual clip model by displaying the matches each model has for the same query, while the differences between the results of the two models are quite subtle for some queries, the examples below clearly show that fine-tuning increases the quality of the search results:
results for query: "Spitzen-Midirock Teilfutter Schwarz" (Lace midi skirt partial lining black) using a zero-shot model and the fine-tuned model
| before | after |
|---|---|
 |
 |
